British VTS180 + Bilstein B14

Preséntate tú y preséntanos a tu coche, cuéntanos tu historia y la de tu coche... :D

Moderador: Moderadores

Notapor wozzaa » Vie Jul 03, 2009 18:04 pm

Julacho escribió:
wozzaa escribió:Filter and pipe are both included. Pipe is the most important part however to be honest.


Ok friend, in my mind stay the CDA of BMC filters, bat yuor numbers are incredible ;)


Oddly I saw a BMC CDA filtered 206 180 the same day. Pulled 165CV with the BMC. Then swapped it to the GSR kit identical to mine and it jumped to 179CV. I would get your car checked on the rollers and see what it is putting out number wise. And then compare to stock if you can. Worth doing as some of these filters the extra noise makes it feel like it is faster. When infact you lose HP.
wozzaa
Copiloto C4atrero
Copiloto C4atrero
 
Mensajes: 31
Registrado: Jue Mar 12, 2009 12:19 pm

Notapor Julacho » Vie Jul 03, 2009 21:02 pm

wozzaa escribió:Oddly I saw a BMC CDA filtered 206 180 the same day. Pulled 165CV with the BMC. Then swapped it to the GSR kit identical to mine and it jumped to 179CV. I would get your car checked on the rollers and see what it is putting out number wise. And then compare to stock if you can. Worth doing as some of these filters the extra noise makes it feel like it is faster. When infact you lose HP.


All rigt, very nice inormation.
I have other cuestions :D

The air filter stay in a box?
The GSR does very much noise?
How much dificult is to install?
Where i can buy it? (I search in ebay uk, but nothing)
¡¡¡6.000!!!
!!!6.000!!!
¡¡¡6.000!!!
Avatar de Usuario
Julacho
C4atrero Premium
C4atrero Premium
 
Mensajes: 7324
Registrado: Mar Dic 05, 2006 9:11 am
Ubicación: Vigo (GZ)

Notapor kban » Mar Jul 07, 2009 13:59 pm

welcome to c4atreros.es i have seen your photos your car its a racig style.

wath s you max speed i you c4 whith chip?¿? <
Imagen
Avatar de Usuario
kban
Fitipaldi C4atrero
Fitipaldi C4atrero
 
Mensajes: 1667
Registrado: Mar Jun 19, 2007 15:59 pm
Ubicación: alonsotegui bizkaia

Notapor wozzaa » Vie Jul 10, 2009 22:19 pm

Julacho escribió:
wozzaa escribió:Oddly I saw a BMC CDA filtered 206 180 the same day. Pulled 165CV with the BMC. Then swapped it to the GSR kit identical to mine and it jumped to 179CV. I would get your car checked on the rollers and see what it is putting out number wise. And then compare to stock if you can. Worth doing as some of these filters the extra noise makes it feel like it is faster. When infact you lose HP.


All rigt, very nice inormation.
I have other cuestions :D

The air filter stay in a box?
The GSR does very much noise?
How much dificult is to install?
Where i can buy it? (I search in ebay uk, but nothing)


There is a problem with distribution of the GSR kits. The guy making them can't meet demands at the moment. GSR is basically 1 man. He does everything though from Exhausts, Camshafts, intakes etc. He is well known in the Fiat circle but has just started making things for the PSA cars. What I would do is contact him via the links on the website. Contact info below.

http://www.gsrengineering.com/engineeri ... ontact.htm

You can hear the noise in the video but that is it at full throttle. Around town will barely hear it. Just as easy as any other kit to install as well. 1 bracket and 2 jubilee clips. The hardest part is removing the original items. As the resonator can be a bugger to get out. Sometimes comes out very easily other times very difficult.

The air filter is not contained now but where it is located in the engine means it is only fed with cold air. If you go for a drive and then pull up the rest of the bay will be very hot but where the filter is nice and cool. Which is how it should be. Also protected from rain etc by the engine tray / wheel liners.

kban escribió:welcome to c4atreros.es i have seen your photos your car its a racig style.

wath s you max speed i you c4 whith chip?¿? <


Max speed I have ever done is 220km/h. To be honest going fast isn't that great you get used to travelling at speed quickly. So it gets boring. It is how fast you can get up to speed I am interested in. The 180 even if it had 400cv would only go around 255km/h anyway. Where the limit is in 5th gear. It really needs a 6th gear car is held back by the gearbox.
wozzaa
Copiloto C4atrero
Copiloto C4atrero
 
Mensajes: 31
Registrado: Jue Mar 12, 2009 12:19 pm

Notapor Julacho » Mar Jul 14, 2009 17:31 pm

wozzaa escribió:There is a problem with distribution of the GSR kits. The guy making them can't meet demands at the moment. GSR is basically 1 man. He does everything though from Exhausts, Camshafts, intakes etc. He is well known in the Fiat circle but has just started making things for the PSA cars. What I would do is contact him via the links on the website. Contact info below.

http://www.gsrengineering.com/engineeri ... ontact.htm

You can hear the noise in the video but that is it at full throttle. Around town will barely hear it. Just as easy as any other kit to install as well. 1 bracket and 2 jubilee clips. The hardest part is removing the original items. As the resonator can be a bugger to get out. Sometimes comes out very easily other times very difficult.

The air filter is not contained now but where it is located in the engine means it is only fed with cold air. If you go for a drive and then pull up the rest of the bay will be very hot but where the filter is nice and cool. Which is how it should be. Also protected from rain etc by the engine tray / wheel liners


Ok friend, thanks for the information.
Probably we make one purchase combines

You belive tah t the boy who makes the intakes have any problems in sending them to Spain?
¡¡¡6.000!!!
!!!6.000!!!
¡¡¡6.000!!!
Avatar de Usuario
Julacho
C4atrero Premium
C4atrero Premium
 
Mensajes: 7324
Registrado: Mar Dic 05, 2006 9:11 am
Ubicación: Vigo (GZ)

Notapor wozzaa » Sab Ene 16, 2010 16:14 pm

Been a while since I updated this but some new kit.

No decent pictures yet as the weather has been awful with the snow and ice. Only taken these on my drive. But anyway...Pictures.


Bilstein B14 coilover kit.

Imagen
Imagen

Fitted to the car. Although think I may have the get the rear raised a little not sure if I like it that low.

Imagen
Imagen
Imagen
Última edición por wozzaa el Sab Ene 16, 2010 16:24 pm, editado 1 vez en total
wozzaa
Copiloto C4atrero
Copiloto C4atrero
 
Mensajes: 31
Registrado: Jue Mar 12, 2009 12:19 pm

Notapor Lewis » Sab Ene 16, 2010 16:23 pm

I boast friend, you have the car that gives taste!

Congratulation!

A greeting!
Avatar de Usuario
Lewis
C4atrero Profesional :D
 
Mensajes: 12529
Registrado: Mié Jul 23, 2008 7:31 am
Ubicación: Málaga

Notapor wozzaa » Lun Abr 26, 2010 5:29 am

Little update got some more new parts for the car.

Tarox 330mm 2 piece, 10 piston front brake kit. Picked this up from a guy who had someone crash into the back of him. Only cost me roughly €450. Discs and pads are virtually new, less than 4,000km on them. They originally cost €2500. No longer green. I completely stripped and rebuilt them.

Imagen

Also changed the rear lights to new facelift C4 versions. (My other C4 is also in the picture 2.0 HDI EGS Exclusive Grand Picasso)

Imagen

Had this installed a long time but never added pictures.
Imagen

Alpine D106R
Alpine NVE-M300P Navigation
Alpine PXA-H100 Imprint processor
Alpine KCE-BT400 Bluetooth.
iPhone dock next to it.
Front speakers: Rainbow SAC265.25
Rear Speakers: Rainbow: SL 165
Subwoofer: Resonant Engineering SE 12
Amplifiers : Genesis Profile 4, Genesis Profile Sub
Lots of Dynamat Extreme...more to do yet though.

All hidden under false floor in the boot (trunk). So can't see anything except black carpet, going to change that soon though.
wozzaa
Copiloto C4atrero
Copiloto C4atrero
 
Mensajes: 31
Registrado: Jue Mar 12, 2009 12:19 pm

Notapor Lewis » Lun Abr 26, 2010 9:16 am

Very nice my friend! :D
Avatar de Usuario
Lewis
C4atrero Profesional :D
 
Mensajes: 12529
Registrado: Mié Jul 23, 2008 7:31 am
Ubicación: Málaga

Notapor Predator » Lun Abr 26, 2010 9:19 am

Very nice kits, perfect.
Imagen
Predator-Car "Demasiado pobre para tener un Evo, demasiado rico para no tener un TaTa"
Avatar de Usuario
Predator
C4atrero Profesional :D
 
Mensajes: 2356
Registrado: Jue Abr 12, 2007 22:20 pm
Ubicación: Omnipresente

Notapor LoGos » Lun Abr 26, 2010 9:58 am

wozzaa escribió:Imagen


Manjarín!!

Es es un dedo gordo del pie o una butifarra?????? xDDDD


Muy buena suspension, una manera muy util y elegante de gastatrse 850 euros ;)
Somos lo que protegemos.

Bittor escribió:Mira guapetón, con mi mercedacos con la S, te pongo el babero, te caliento el potito, te cambio los pañales, te saco los mocos, y en 2ª...
Avatar de Usuario
LoGos
C4atrero Profesional :D
 
Mensajes: 7754
Registrado: Dom Jul 01, 2007 23:38 pm
Ubicación: Cerca de la puerta de Tannhäuser

Notapor wozzaa » Jue Jun 17, 2010 3:12 am

Brakes were stripped down and rebuilt and are now installed.

Imagen

A picture I found someone else took of the car at a show this weekend.

Imagen

I have some videos from an internal cam of it on track at the weekend. Unfortunately they are huge files at the moment and need shrinking down, currently 1.8GB. Will likely get them on my youtube account at some point, hopefully in the next few days.

Was an absolute dream to drive on track with the B14's and the Tarox brakes though. Now just need to sort money out for a rotrex supercharger conversion.
wozzaa
Copiloto C4atrero
Copiloto C4atrero
 
Mensajes: 31
Registrado: Jue Mar 12, 2009 12:19 pm

Notapor Spect » Jue Jun 17, 2010 3:32 am

Cagonmimanto con los inglesitos, como se cuidan. Pa joderlos.

wozzaa escribió:Now just need to sort money out for a rotrex supercharger conversion.

:shock:

Tengo el rabo ahora mismo como la pata de un perro envenenao
Avatar de Usuario
Spect
Fitipaldi C4atrero
Fitipaldi C4atrero
 
Mensajes: 1721
Registrado: Mar Dic 25, 2007 22:04 pm
Ubicación: Cacabelos (El Bierzo)

Notapor danielrau » Jue Jun 17, 2010 14:31 pm

Had this installed a long time but never added pictures.
Imagen

Un segundo un segundo....habéis visto el consumo que tiene?? quiero pensar que las medidas las tiene cambiadas o algo, porque....39,1L/100... :shock: :shock: :shock: :shock:
Avatar de Usuario
danielrau
C4atrero Profesional :D
 
Mensajes: 3250
Registrado: Lun Oct 26, 2009 23:10 pm
Ubicación: madrid

Notapor LoGos » Jue Jun 17, 2010 14:39 pm

danielrau escribió:
Un segundo un segundo....habéis visto el consumo que tiene?? quiero pensar que las medidas las tiene cambiadas o algo, porque....39,1L/100... :shock: :shock: :shock: :shock:


Mira la foto, eso es que viene de zurrarle, porque le marca medio deposito y que solo puede hacer 205 km....seria al salir de un tramo o de un circuirto ;)
Somos lo que protegemos.

Bittor escribió:Mira guapetón, con mi mercedacos con la S, te pongo el babero, te caliento el potito, te cambio los pañales, te saco los mocos, y en 2ª...
Avatar de Usuario
LoGos
C4atrero Profesional :D
 
Mensajes: 7754
Registrado: Dom Jul 01, 2007 23:38 pm
Ubicación: Cerca de la puerta de Tannhäuser

Notapor Andrew » Jue Jun 17, 2010 14:49 pm

Pero son MPG no? Si haces la conversion a L/100km te sale solo 6.02, si es asi no es tanto xD
Imagen
Avatar de Usuario
Andrew
Piloto titular C4atrero
 
Mensajes: 781
Registrado: Lun Jul 30, 2007 14:18 pm
Ubicación: VTS 1.6 HDi 110CV

Notapor Rubenkas » Jue Jun 17, 2010 14:58 pm

Si os fijáis lo tiene puesto en millas.

Poned el vuestro en millas y veréis el canguelo que os entra :mrgreen:
Imagen
Avatar de Usuario
Rubenkas
C4atrero ilustre
C4atrero ilustre
 
Mensajes: 4751
Registrado: Mar Ene 02, 2007 18:53 pm
Ubicación: Sabadell (Barcelona)

Notapor Martrix » Jue Jun 17, 2010 15:14 pm

Bienvenido Tom!
No veas como suena tu carro en el video...
:babeando:
Buenas modificaciones!
;)
Mi Car (AQUI!!)
Mi Mercadillo (AQUI!!)
Avatar de Usuario
Martrix
Moderador
Moderador
 
Mensajes: 14512
Registrado: Sab Ene 26, 2008 16:28 pm
Ubicación: Barcelona

Notapor Julacho » Jue Jun 17, 2010 17:22 pm

wozzaa escribió:Bilstein B14 coilover kit.

Imagen
[img]


:babeando:

Oooohh i need it, but i haven´t money :cry:
And the Tarox... you had a lot of lucky with this purchase


Si se cuidan si Spect, es otra cultura y tienen facilidades que nosotros aqui no :(
¡¡¡6.000!!!
!!!6.000!!!
¡¡¡6.000!!!
Avatar de Usuario
Julacho
C4atrero Premium
C4atrero Premium
 
Mensajes: 7324
Registrado: Mar Dic 05, 2006 9:11 am
Ubicación: Vigo (GZ)

Notapor osfago » Jue Jun 17, 2010 18:40 pm

Oh my god!
You are my idol hahaha ...
Go on, you have it brutal!
Imagen
...click para ver ;)
Avatar de Usuario
osfago
Colaborador
Colaborador
 
Mensajes: 10023
Registrado: Lun Abr 07, 2008 19:01 pm
Ubicación: Navarrete (La Rioja)

Re: British VTS180 + Bilstein B14

Notapor wozzaa » Sab Ene 22, 2011 0:10 am

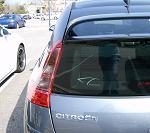
Yes my fuel consumption and speedo are in miles. We still use Miles rather than Kilometres in the UK. Basically due to the costs involved in changing all the signs and as we are an island it seemed fairly pointless to the government. Bit like when they thought about changing to left hand drive cars and driving on the other side. Would mean redesigning lots of one way systems so again was deemed too expensive for something that doesn't really matter.

Anyway thought I would update you all with my current project on the car. Got lots to be done in the next few months. Citroen styling kit needs fitting and spraying, looking at upgrading the camshafts in the engine and exhaust. Hoping to hit 200hp with that done. However the current project is my new stereo install.

The equipment going into the car will be.

JL Audio ZR650-CSI front component speakers.
Rainbow SL 165 rear speakers.
2 x RE Audio SE 12" subwoofers
Genesis Profile 4 Channel amplifier, for speakers.
Genesis Profile Sub Ultra for subwoofer. 1 x 1000w RMS, but under rated typically put out 1200W+
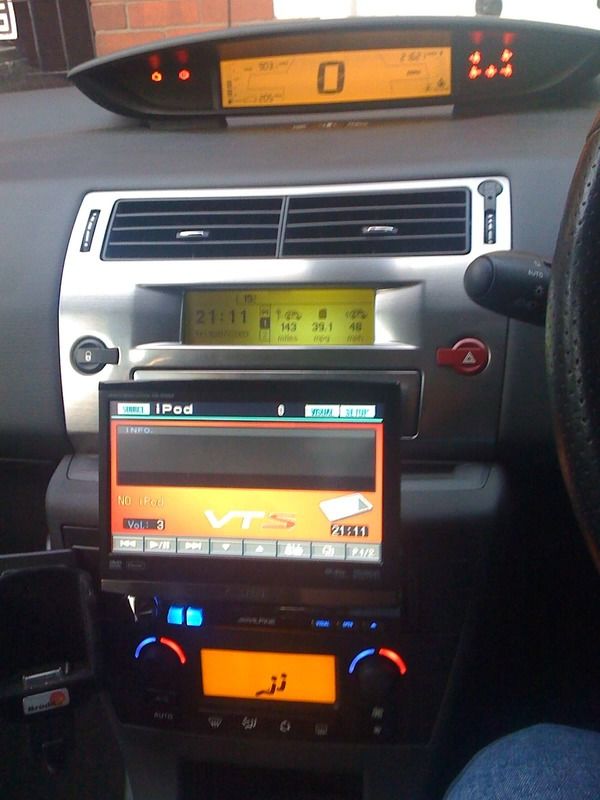
Alpine IVA-D106R Headunit
Alpine NVE-M300P Navigation
Alpine KCE-400BT bluetooth
Alpine PXA-H100 Imprint processor
Alpine TUE-T150DV Digital TV and DAB radio reciever

Copied and pasted from the C4Owners forum. We have been working on it a few days now.
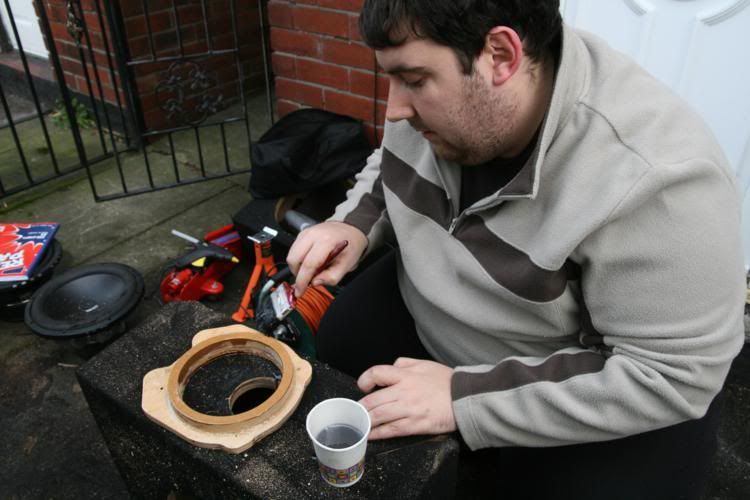
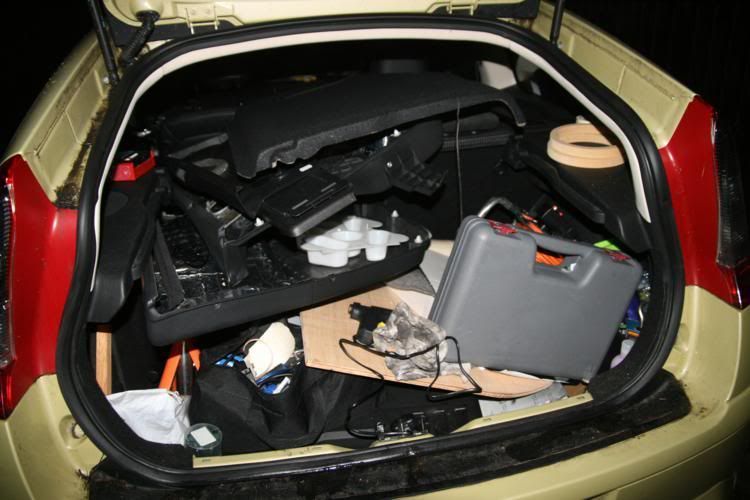
Day 1

Well though I would do this as a project thread. Only really started today on the build. I know a few will possibly look at this and just want to see pictures rather than read, at the moment not much to show. But as it progresses there will be more. Going to take a while to complete. Probably going to take me two weeks plus easily to get it done. Working on it pretty much every day. However there are two of us doing the work which is a good thing. Technically doing two installs. His and my own. So while waiting for bits of mine to dry / bond we work on his.

Still not actually got all the equipment that will be installed yet, but it will all come as the project progresses.

So couple pictures of what was done today, which took longer than you might think will explain with the pictures.

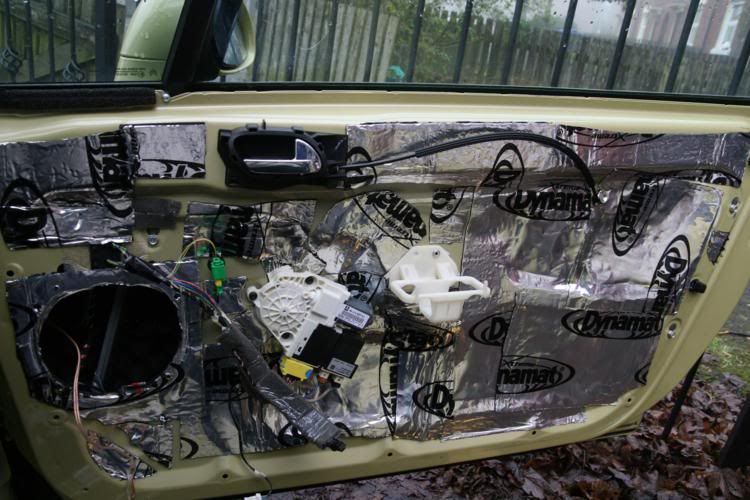
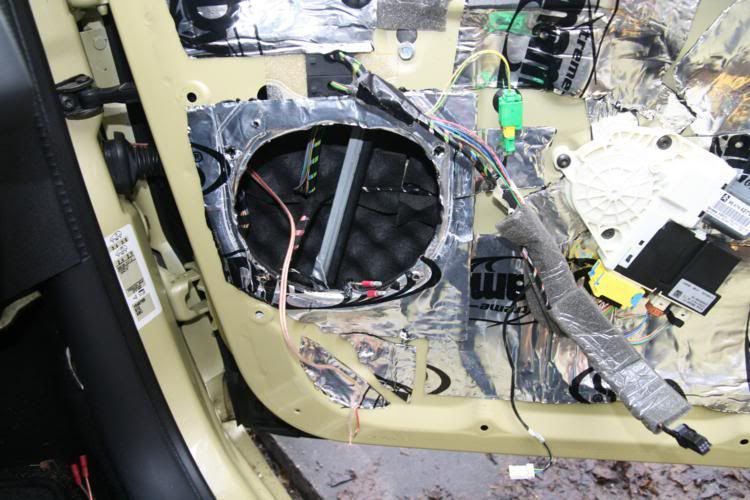
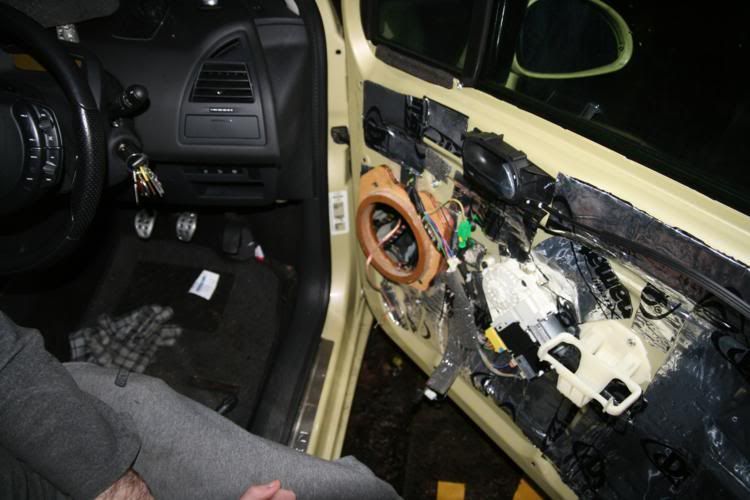
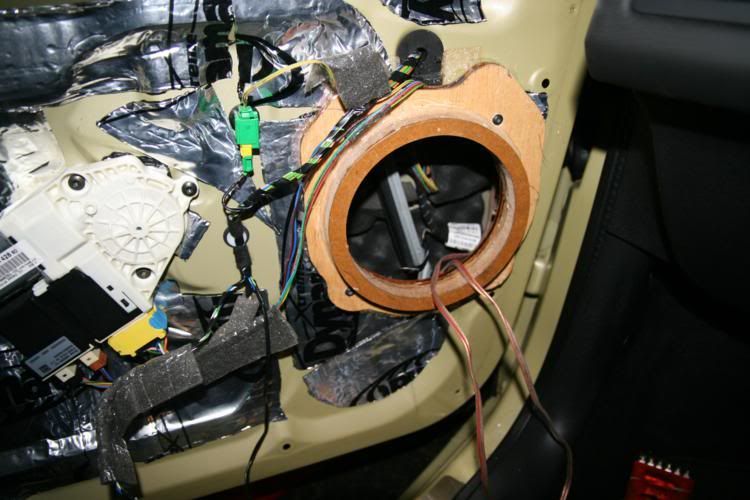
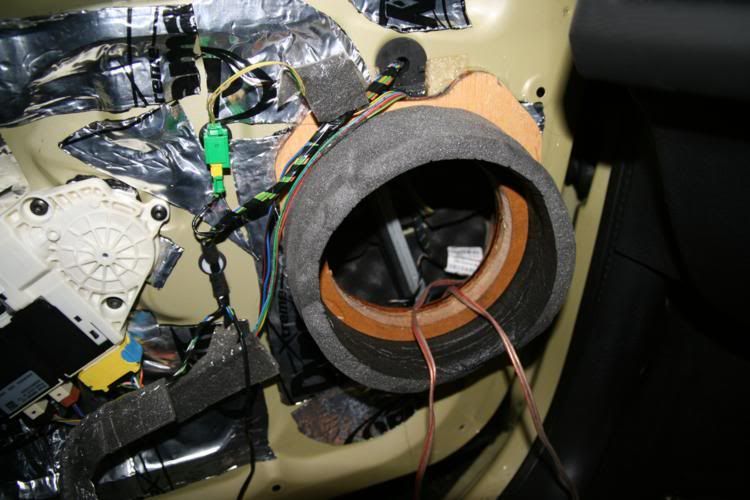
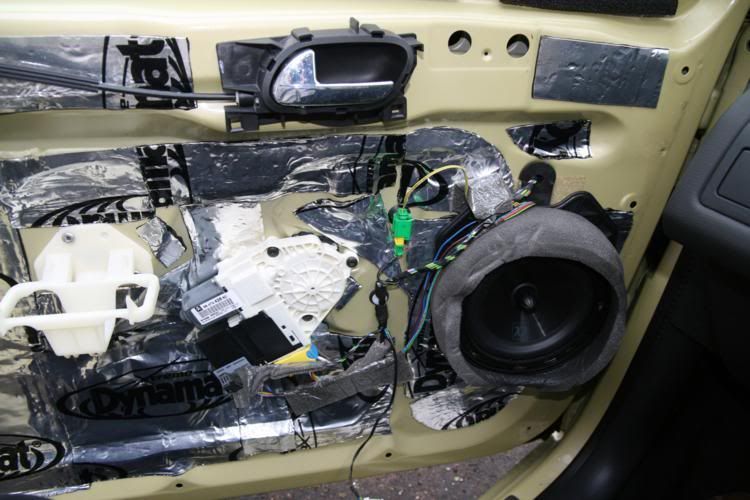
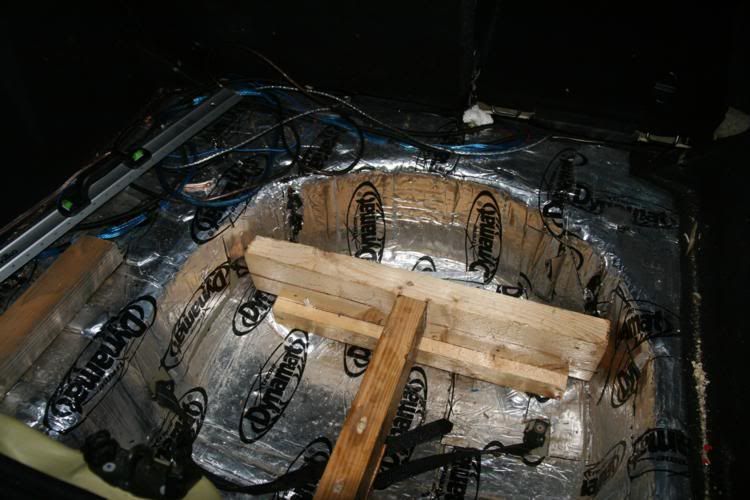
Obviously the whole boot is sound deadened. Used a good few sheets of Dynamat Xtreme. All the boot floor, wheel arches, hatch, C pillars etc. All been given a decent layer of deadening. Cabling is from the original install but is all going to be replaced. The 4 gauge is coming out and 0 gauge is going in. New sub amp is much more powerful hence the upgrades. Along with some other wiring upgrades, and likely a new battery designed with audio installs in mind. Just got to wait on parts arriving. New battery terminals, wiring kit etc.

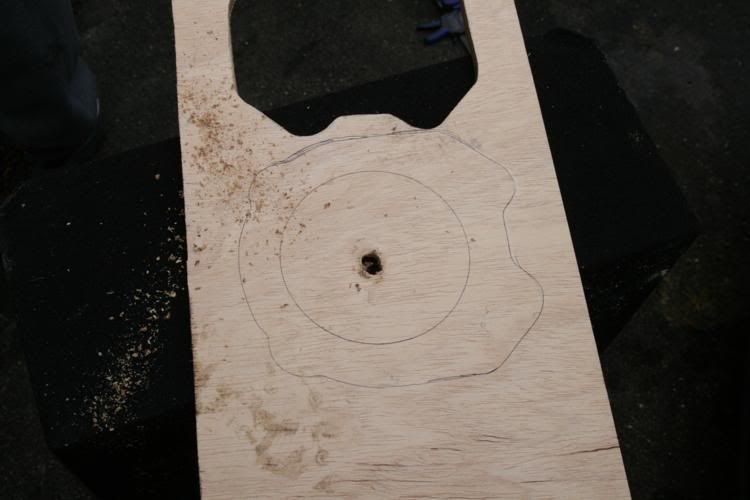
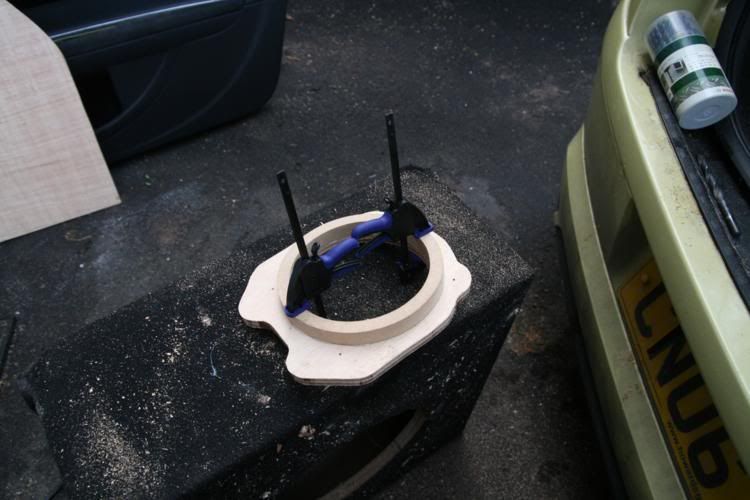
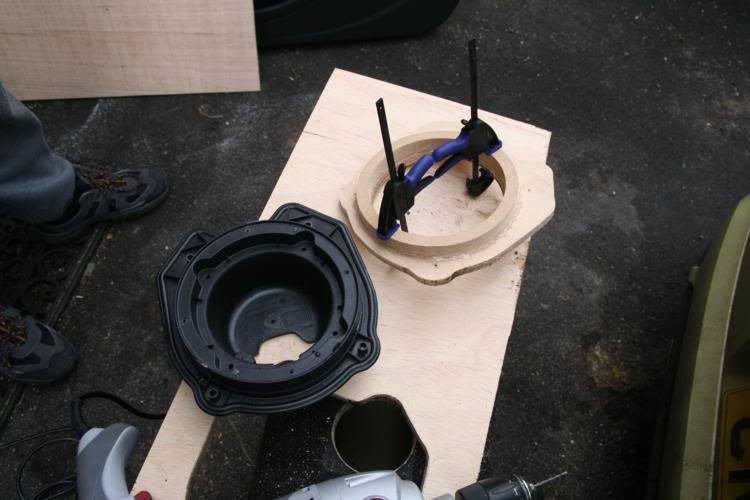
So first things first, build time. Some scrap wood I had lying around I pulled to bits off my old build to fabricate a support for the new lower floor section. Just basically test fitting bits and trying to get heights right. Lots of trimming and trying different bits of wood to get the heights right, this won't ever be seen so not a big deal that it looks rough.

Imagen

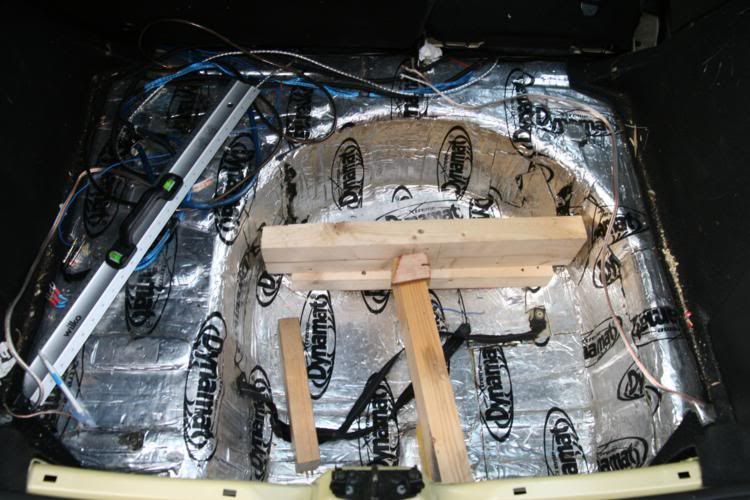
After it was all measured and I was happy with heights etc was all bolted together into a single piece. Then gave it a coat of resin and hardener, reason being that as it is going to be in the wheel well it could get a bit wet. Water + non protected wood = rot. So used the resin and hardener to seal it all up and also just help make sure its solid.

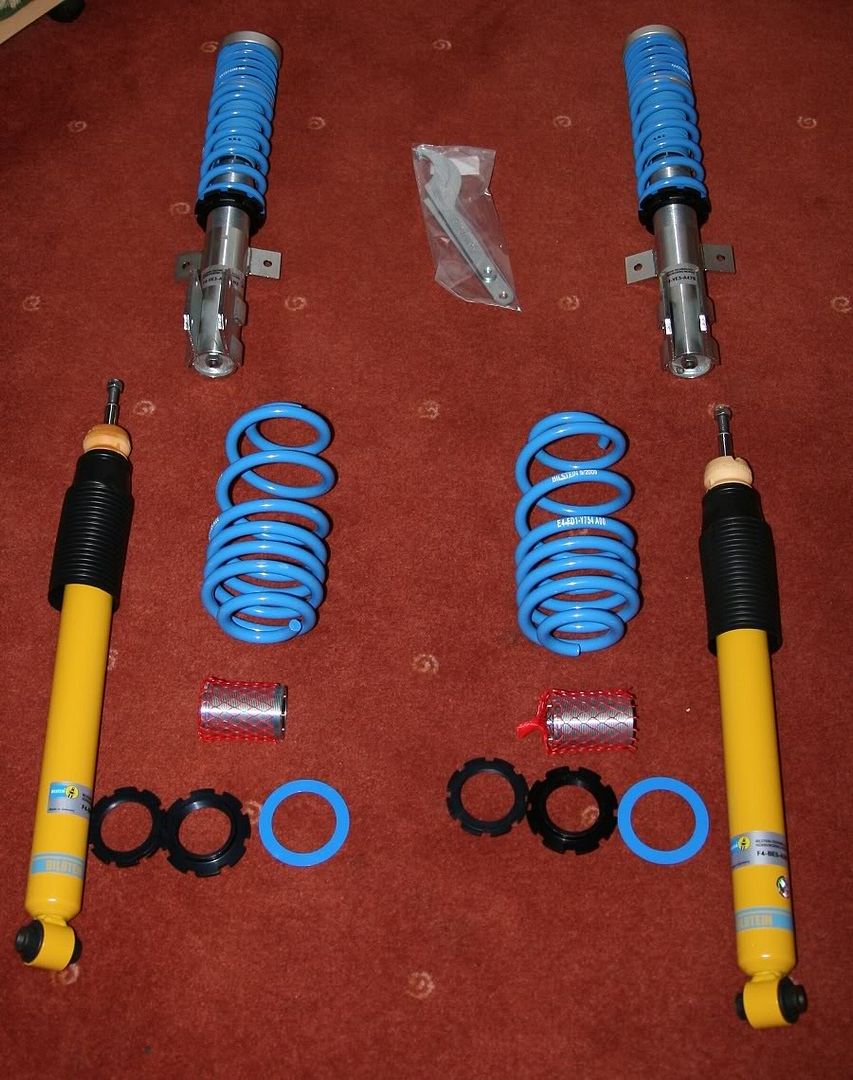
Then it came time to secure it, now I could just attach the top sheet to this and leave it to rest in the wheel well. However not really a fan of that. Afterall if I had an accident there is a good few kilograms worth of equipment that can soon turn into quite deadly missiles. Prefer it to be safely installed and properly secured. So at this point the axle stands came out the car was jacked up. Blue springs from the coilovers making a little appearance.

Imagen

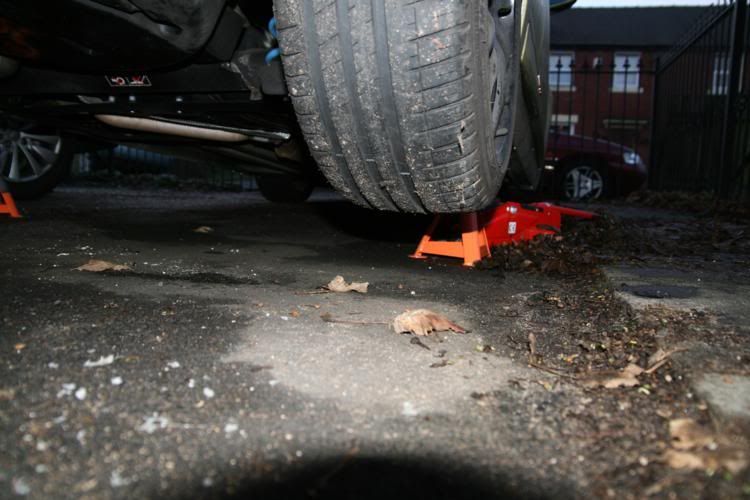
The cover under the car was removed and 4 new small holes were drilled through the wheel well and into the wood. Three to bolt into the wooden frame. Used the same points for putting my bolts in as Citroen did for the undercover plastic protection right next to each other so obviously a good place to secure points too. Also the cover protects it all so not open to the elements etc. Was all bolted together and then ran hot glue over the bolts etc to make sure that it was water tight. Don't want the bolts going rusty etc.

Also added a new drainage point. As I had noticed I was getting a lot of water in the wheel well. Possibly the Dynamat and it getting condensation on it. Also sealed any original drainage with said Dynamat so a small drainage point was added at the lowest point.

All secured and everything refitted. The wood is now physically attached to the wheel well from under the car. Resin is dried, not much different from before when I was measuring looks wise. But talking a couple hours work with everything being done. Waiting for it to dry, jacking the car etc up.

Imagen

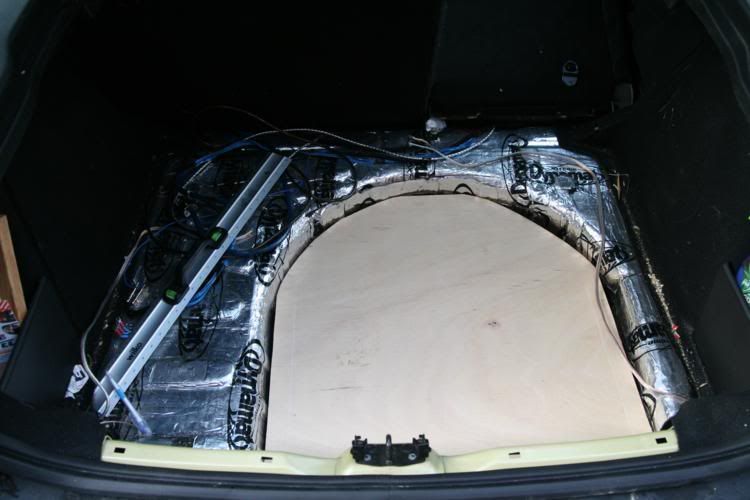
The rough top plate was then cut out, again not going to ever be seen as part of the install. It's just there for me to attach other bits to. Just need a nice secure point for everything to attach to. Also with everything being bolted to everything else properly. Should hopefully get rid of anything that might potentially cause rattles.

So as it doesn't need to be perfect the points around the edges don't have to line up perfectly. Makes it much easier, as cutting something to the shape of the wheel well. Where I need it would not have been fun. I didn't fancy making templates for something that is never going to be seen.

Imagen

We also managed to repair my fog light while the car was in the air. I still had not got round to fixing it, as the car wasn't used when we had the snow. Nor did I fancy doing it then, plus just never had the time. However fixed it today when the car was jacked up.

In the end just secured it with a bit of hot glue from the glue gun. Was only one of the clips that was snapped, so a bit of hot glue and it's perfect now. Why spend £25 or so, when a few pence worth of glue does the same job? The bit of the clip that had broken off was still there, so sorted nice and easily.

So basically this is all we got done before it got too dark to work, tomorrow starting on the door builds. Going to get a bit more done in the boot hopefully. Get the next layer up done, make sure its perfect. As that is a layer that will be seen, going to need to be a bit more careful with that one. Early start on it tomorrow, should be able to get more done as I won't need to pop out for materials, tools etc.
Última edición por wozzaa el Sab Ene 22, 2011 0:21 am, editado 1 vez en total
wozzaa
Copiloto C4atrero
Copiloto C4atrero
 
Mensajes: 31
Registrado: Jue Mar 12, 2009 12:19 pm

Re: British VTS180 + Bilstein B14

Notapor wozzaa » Sab Ene 22, 2011 0:20 am

Day 2

Didn't start as early as I hoped, basically alarm went off at 9am. With me still coughing my guts up didn't feel like getting up. So stayed in bed for an hour or so longer. Then my friend had to run an errand, then I did as well. So was getting on for 12:30 by the time we actually got started on it today.

So anyway, more pictures and more descriptions.

Started on the door builds today, so door panels off. Again door panel is fully sound deadened, might not have total coverage but there is Dynamat behind as well. Multiple layers on the different sections of the door. Also installed some material which is supposed to help reduce back wave distortion. We shall see.

So door stripped off, standard speaker mounts removed. All materials installed. Will probably add more sound deadening nearer the end of the build.

Imagen

Imagen

So measuring and cutting time. Getting rid of the bendy plastic mounts, replacing them with solid wood mounts. The speakers that are going in here are rather expensive so I wanted to try and get the firmest mounting point for them possible.

Imagen

Imagen

Imagen

Me laying down a layer of resin on top of the wood.

Imagen

Unfortunately due to the temperature around -1 today. The resin just would not dry outside. Typically it needs to be 15c or so for it to cure quickly. So this caused some problems. Had to knock up a little stand and take them into the dining room to dry in the warm. Thankfully I have a mother that is quite understanding about my projects and other than having to leave the back door open to keep the place vented wasn't that bothered.

Anyway once they had dried it was time to get them installed.

Imagen

Imagen

Imagen

And for those curious the standard items looked like this when installed. With the rubbish old Alphasonik speakers.

Imagen

I do really need to lay some more sound deadening down. When I did it at first I ran out basically. Now have another 9 sheets. So planning to get that all installed as well. However that can be done when all the building is out of the way as it's a simple job to do.

Anyway by the time that was all done it was getting dark again. So just fired everything back in the car to start again tomorrow. So this is how the car was left tonight.

Imagen
wozzaa
Copiloto C4atrero
Copiloto C4atrero
 
Mensajes: 31
Registrado: Jue Mar 12, 2009 12:19 pm

Re: British VTS180 + Bilstein B14

Notapor wozzaa » Sab Ene 22, 2011 0:28 am

Day 3

Took no pictures today as it was purely wiring the speakers in.

As the crossovers for them will be in the back of the car with the amplifiers. All new cables for the speakers had to be run to get them to the back of the car. I could have done it quickly but I wanted to do it properly.
So all new cabling was run using through the standard rubber protection boots in the doors for the woofers. And all new cabling for the tweeters as well. Nothing at all can be seen when looking in the car that gives it away. Most people won't realise it is not standard until they hear it, or until the screen pops out of the dash.

Hopefully I can get a little more done tomorrow on the front speakers. However supposed to be having a meet tomorrow with the UK forum. Will likely end up leaving the VTS180 at home and taking my Grand Picasso, just don't enjoy driving the Picasso as much a the 2.0 HDi is too slow.
wozzaa
Copiloto C4atrero
Copiloto C4atrero
 
Mensajes: 31
Registrado: Jue Mar 12, 2009 12:19 pm

Re: British VTS180 + Bilstein B14

Notapor albertomv01 » Sab Ene 22, 2011 0:51 am

Ah, ok, your musical project is perfect, but... but I prefer that you put yours hand in the engine that in radio. :mrgreen:

I love your brakes, my friend... your car is so nice... is a good preparation for a street car. :babeando:
Mi cabeza nunca para, a veces la adelanta el corazón, pero nunca para...
Avatar de Usuario
albertomv01
C4atrero Premium
C4atrero Premium
 
Mensajes: 6170
Registrado: Mar Oct 23, 2007 0:14 am
Ubicación: Aquí, en Madrid

Re: British VTS180 + Bilstein B14

Notapor Tuner777 » Sab Ene 22, 2011 1:02 am

que raro se me hace ver el volante a la derecha xD
Imagen
Fé en dios y hierro a fondo :conductor:
Miembro Club Llantas Blancas nº10
Avatar de Usuario
Tuner777
Piloto titular C4atrero
 
Mensajes: 643
Registrado: Vie Feb 19, 2010 1:18 am
Ubicación: Granollers (Barcelona)
AnteriorSiguiente

Volver a Preséntate y preséntanos tu coche!

¿Quién está conectado?

Usuarios navegando por este Foro: No hay usuarios registrados visitando el Foro y 28 invitados